Mr Merlin your scrog is very impressive. You should put out a diagram of measurements to make it easy for us less than crafty people (me). ![]()
![]()
7 Likes
I think that I have posted this before but it never hurts to do it again. It is easier than finding a previous post and giving you a link.
Here is a cut list:
SCROG Bill Of Materials and Cut List
This design is specific to growing in 10 gallon pots (fabric and plastic)
NOTE: Adjust sizes to meet your specific needs
Base Unit
(1 ea) 22" X 22" X 1/2" plywood
(5 ea) 1" swivell casters
(4 ea) 1/2" PVC 90 degree elbow
(8 ea) 1/2" PVC “T”
(8 ea) 1/2" PVC 45 degree elbow
(4 ea) 3/4" cross
(8 ea) 3/4->1/2 reducer bushing
(8 ea) 1/2" PVC pipe 9" long - lower base frame
(4 ea) 1/2" PVC pipe 20 1/2" long - upper base frame supports
(8 ea) 1/2" PVC pipe 6 3/4" long - upper base frame
(8 ea) 1/2" PVC pipe 3 1/2" long - upper base frame
SCROG Frame
(4 ea) 1/2" PVC “T”
(8 ea) 1/2" PVC 45 degree elbow
(8 ea) 1/2" PVC pipe 14" long - SCROG frame
(8 ea) 1/2" PVC pipe 4" long - SCROG frame
(4 ea) 1/2" PVC pipe 16" long - SCROG frame vertical supports
You will need about four 10’ pieces of 1/2" PVC pipe for each setup that you build.
Four of the casters will be attached near the corners of the plywood base and the fifth caster will be attached in the center of the plywood and will have washers placed between the caster flange and the plywood to make the center wheel a tiny bit taller than the corner wheels. This is done to make rotating easier.
The “SCROG frame vertical supports” have 1/4" holes drilled every 4" for the adjustment pins.
Use twine or string for the actual screen. Either install 1/2" sheet metal screws or drill holes every 3" - 4" for the twine/string.
One last thing that I did was to put screws at each “corner” around both the frames and strung twine very tightly to hold everything together. I did this rather than glueing so that I could easily modify or store the SCROG frames.
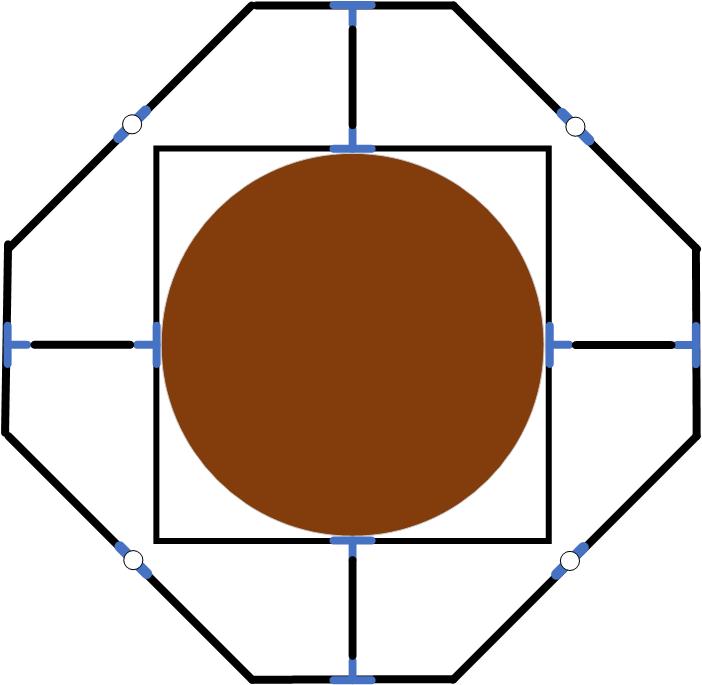
This a rough diagram:
And here are some photos:


I hope that you find it useful. If you have any questions, I would be glad to help out.
24 Likes
@Flitme I should point out that making the top frames square rather than truncating the corners would make the whole assembly a bit easier to build and cost less because fewer fittings would be needed.
The reason that I truncated the corners is that I rotate my plants. Truncating the corners allows the frame to be wider and still allow for rotation without a big hassle.
Also leaving out the adjustable upper frame would significantly reduce the cost. It is simply a matter of what you need and what you want to do with your SCROG’s.
7 Likes
Very nice saw Mr @merlin44. I have a couple Deltas. I also have same control for my dust collector! Besides growing the girls and my bees Ive always had a decent wood shop. I also started some pvc work myself. I bought some 4-way fittings but, will have to wait to take tent apart to install them. This is what I came up with untill then.


I notched the ends of 1" pvc and will string mason cord for the tops.
15 Likes
Very nice work @BeeKeeper2. Having decent tools makes many projects much easier to pull off.
I actually have several of the remotes so that there is always one handy regardless of which tool/station that I am working with.
7 Likes
I just posted some before tucking and after tucking photos on another topic.
Here is a link to it for those that may be interested.
8 Likes
Very informative info. I can see where this is very useful… great teaching ![]()
![]()
5 Likes
I like to turn my plants too so your design is perfect. I am going to figure what size I need for 5 gallon fabric pots and I will get the materials I need. I will post pictures and of course I am sure I will have more questions.
You did Excellent on telling me what and how to build the scrog. Thank You so Much ![]()
![]()
7 Likes
Good Morning! Is anyone up for a mid-week update (normal updates on Tuesday)? I take photos each day but I will not post any for this update. If anyone is jonesing for photos will put some up but I think we all see plenty of nice photos each day. ![]()
My plants were flipped to flower four days ago and I tucked everything under the screen two days ago. Today there is no evidence of the tucking and both are growing vigorously.
They are consuming nearly 2 gallons of water each day. I am now watering in two sessions because the root mass is so dense that it takes a while for the water to soak in. I give them about 1 quart of water four times in each session. I use a small garden scratcher to break up the surface (and to scratch in the nutrients on feeding days) before applying the water. I hope that this assists in getting the water into the root zone.
Every third day I let them go with just a tiny drink (maybe 1 quart) to let them suffer through a bit of a drought. Perhaps this makes them appreciate the full watering when it happens. LOL
I will post a full update with photos on Tuesday. Have a great weekend everyone!
16 Likes
I think we all can handle a few more pictures when they’re as great looking as what you normally present Monsieur Magic Man! ![]()
I wish you and your magical Madame a very marvelous day ![]()
14 Likes
Thanks, Kap! I am taking her out for lunch to celebrate Valentine’s Day. I figure that the restaurants will be a zoo tomorrow and Monday. We are not big on crowds. Mrs Merlin has selected our favorite Mexican restaurant. We hope that you and Mrs 3D have a great weekend and enjoy being together for Valentine’s Day.
15 Likes
Perhaps we should refer to her as Admiral3D. ![]()
![]()
![]()
12 Likes
I may be a rebel at heart but…
Happy wife = Happy life! ![]()
15 Likes
It may not be “cool” but I totally agree. Other than cannabis cultivation, I live for Mrs Merlin and her welfare.
14 Likes
Then we’re even more alike than we thought my friend! ![]()
And to me that’s the coolest thing. Having the people I love around me, all happy… ![]()
12 Likes
Up to this point I have grown in FFOF. I had considered changing to hydro but I just like growing in dirt.
While out for our Valentine’s Day lunch we cruised out to the grower’s supply shop to pick up some soil.
I have been using Roots Organics nutrients or the last two grows and will now try Roots Organics Original soil. It was a couple dollars cheaper than FFOF because it is made about 40 miles down the road. Three bags for $48.
14 Likes
I just started using Roots Organics Original soil for the first time, as in the other day I filled two grow bags in preparation for upcoming seeds that just started soaking today. It seems good and has lots of perlite.
Hope you had a good Valentine’s Day lunch with the Mrs! ![]()
5 Likes
Thank you @Twelve1, we had a wonderful lunch and brought a snack home for later.
I have added perlite to FFOF but it looks like I won’t need to do that with RO.
5 Likes
To all of you. Reading y’all conversation warms my heart ![]()
![]()
8 Likes
I would choose this over anything ff has.
10 Likes