100% beginner on a (reasonable) budget

I chose the above subject title because I hope this journal will help others like me - I first began my studies a month ago, knowing absolutely nothing about growing. I will also try to keep the use of acronyms to a minimum and explain the ones I use as I go along.

Background: I began this project convinced I was going to use a commercially available space bucket with LED lighting - I wanted to get going as quickly as possible and just grow one small plant at a time. The options available kept snowballing until the price equalled that of a budget tent setup. At that point, I started thinking bigger.

The tent part was relatively easy - first decide on your area and height, then search for quality reviews and compare to pricing.
Lighting on the other hand is a complete nightmare. I was tormented by the decision(I didn’t bother considering fluorescents) of:
Low cost HPS/MH (High Pressure Sodium/Metal Halide), high heat and short bulb life.
High cost LED (Light Emitting Diode), low heat and incredibly long life.

I finally went with the following lighting option, which kind of fits between the other two:
1000 watt dimmable CMH/LEC (Ceramic Metal Halide/Light Emitting Ceramics) light with an air cooled hood.
It’s between the two on pricing, emits less heat than HPS/MH and supposedly has longer lasting bulbs. I plan on running it at a lower wattage for now, but have the ability to crank it up later when I feel more confident.

I also ordered a 48"x48"x73" tent, fan, carbon filter, other miscellaneous items.

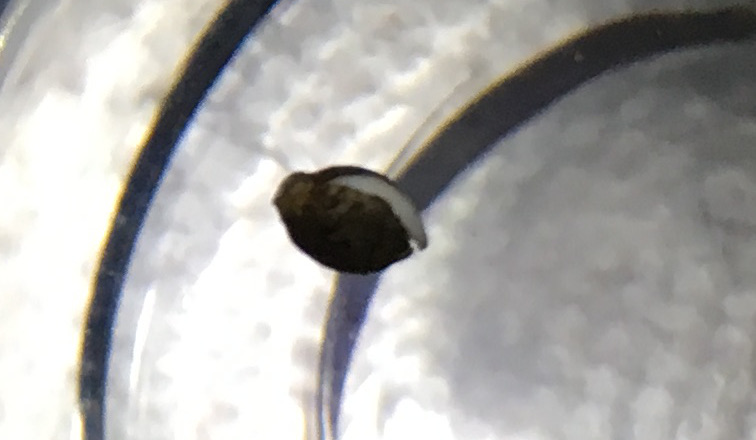
I ordered 5 each of the following seeds from this site:
White Widow Autoflower
Super Skunk Autoflower

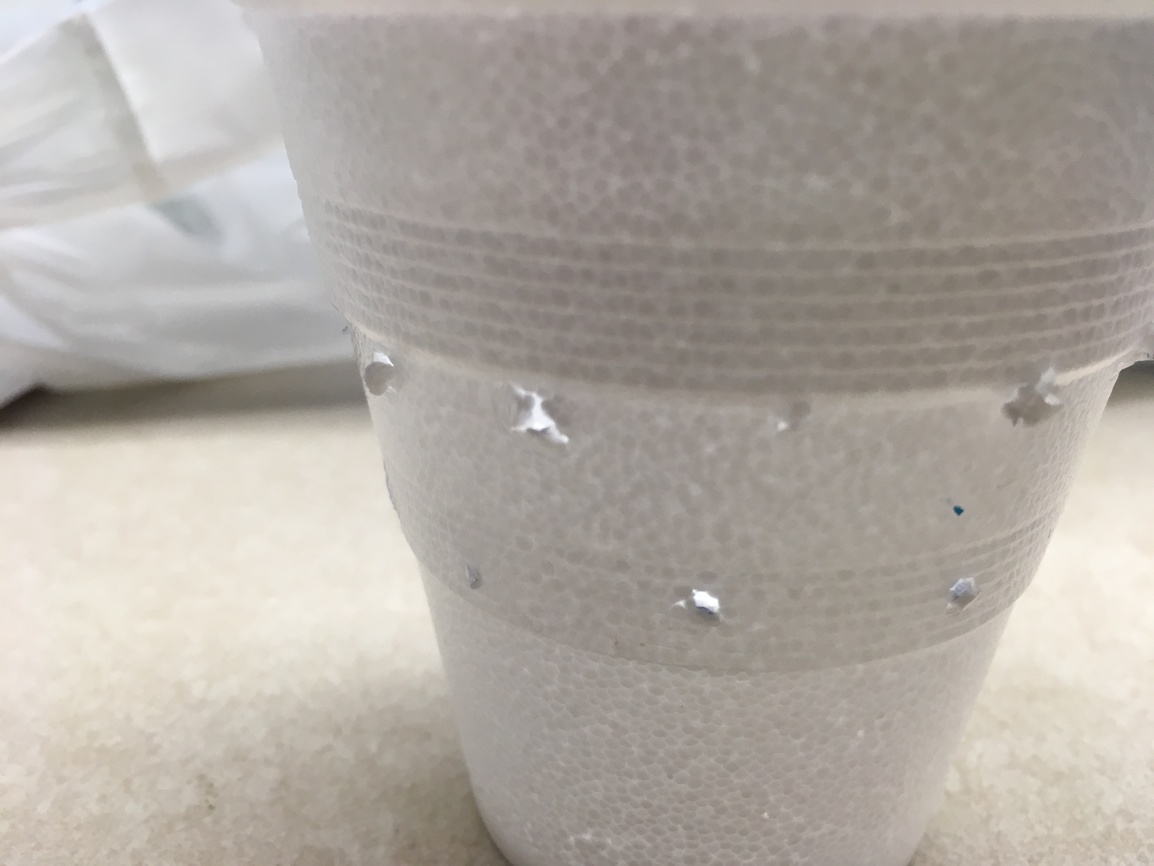
The seeds came much quicker than expected, and I didn’t have a tent yet! So, I decided to build a space bucket and use that to get things started, then move everything to the tent later. If this works out well, I may be able to utilize this setup in the future as well. My space bucket uses (5) 6500K or 2700K CFL (Compact Fluorescent Light) bulbs. I should be finished with the space bucket tomorrow. My investment so far in the space bucket is $132.

4 Likes

Yesterday, I took two of the White Widow seeds and put them each in 3 ounce shot glasses with softened tap water at room temperature (approximately 70 degrees Fahrenheit). I used my softened water because it had a pH of 7 and my hard water had a pH of 8. More studying up on water to come…

20 HOURS later and one of the seeds has sprouted already!!!

I was worried that the other seed might be a dud. I touched it and it sunk to the bottom of the glass. However, 8 hours later (total time: 28 hours) there is a tiny root beginning to poke out. I won’t bother trying to take a photo of that because it is still at the bottom of the glass of water and hard to see.

So, this afternoon I grabbed two more glasses and dropped a single Super Skunk seed into each one.

Tomorrow, I will:
Continue work on my space bucket
Check on the Super Skunk seeds
Transfer the White Widow seedlings to soil.

2 Likes

Looking good like what your doing if you need anything please tag will be following if you doing a journal

I have just received my seeds. I live in the Central Valley of California. This is purely for myself and my wife. She has MS and I have PTSD and TBI. My only real choice is to grow outside as I have no room indoors. So, can I start my seeds outside at any time after freezing temperatures are gone (roughly freezing is January-March). I have read most of your material and I have not seen this answered. I have a regular garden where I will plant and grow and I certainly will follow guidelines but I do not think I have to be crazy about this process. Any help is appreciated.

1 Like

@RVN-Tree I believe your question was probably directed at Hogmaster and not me. You would probably best be served by starting a new topic in the “Plan a successful beginning” section, found here:
https://ilgmforum.com/c/beginner/seeds-soil-and-fertilizer

That said, I think the experts will tell you to go ahead and plant after the spring thaw.

You said you have no indoor space. Have you heard of space buckets? It’s basically a 5 gallon bucket that you can make taller as needed. You can purchase them pre-made or build your own. Food for thought if you haven’t considered one yet.

1 Like

Watch out with using softened water; the salts can build up in your grow medium. It would be better to use plain tap water & then adjust your pH, or use distilled/ro/rain water & then adjust your pH.

2 Likes

@blackthumbbetty is correct about the soft water
When germinating ph doesn’t really matter since you dont have roots @TommyBahama just a fyi
Otherwise spot on answering @RVN-Tree
After spring thaw your safe to start your crop
Most outdoor growers will start in doors and slowly transition plants outdoors when temps allow
You should Start your own topic as well and you will get more traffic RVN :+1:

2 Likes

In the central valley you could start indoors now and veg for 6 weeks or so and move the plants outdoors into a inexpensive greenhouse to finish off the season. They will go into flower and finish in late winter.

@RVN-Tree Sactown here. I’ve never grown outdoors. It’s not legal to grow outdoors here though people do it all the time. What strain do you plan to grow?

Day 2 update:
One of the Super Skunk seeds has a tail after 23 hours. The other one has yet to produce, but it hasn’t even been a full day.

I finished my space bucket today and tested it with nothing in it. It appears to be too hot - right now it is 92 degrees Fahrenheit in the center of the bucket, in a 76 degree room. I’m in the process of bring the room down to 68 degrees to see how it looks then. But, it appears I will either have to add 2 more fans (it has 2 now) or reduce the light - it currently has (5) 23 watt CFL (Compact Fluorescent Light) bulbs, for a total of 115 watts.

I made some small pots to put my seeds into, so that I can put all 4 of the plants into the space bucket. This is a trick I learned when planting tomatoes - it is a cheap way to start the plants, gives the soil access to air and allows for drainage.
I start with some 8 ounce styrofoam cups. I use a ball point pen to poke holes from the inside to the outside.


One thing I am not sure of is - how many holes would be appropriate for this type of plant/root system.

By poking holes from the inside to the outside, it makes the styrofoam protrude, which acts as a spacer between the inner cup and the outer cup, used to collect runoff water.


In this case, I also cut the bottoms out of 4 more cups to stack on the bottom of my outer cup. This is just extra insurance in case the inner cup gets too heavy and begins compressing downward and closing up the holes.

Lastly, I filled the cups with Fox Farms Happy Frog soil. I also purchased some Perlite to mix with it, but when I opened the soil bag, I found that it already has Perlite, among several other ingredients. So, I just put the soil in by itself. I then made a 1/4 inch depression with my finger and placed a White Widow seed in each pot, then lightly covered them with a thin layer of dirt and sprinkled them with about a teaspoon of water.

Besides being very inexpensive, another advantage to the styrofoam cup method is that - when it comes time to transplant to bigger pots, you can very gently peel away the styrofoam from the soil without disturbing anything. Kind of like peeling an orange - just grab a section with your finger and peel it away.

3 Likes

Great idea with the cups. A lot of people use solo cups as starter pots. I do not use the cup method, myself, though I use clear plastic cups as domes, if needed. I definitely would not use styrofoam, but that’s a personal preference.

Autoflowers do not like being transplanted. I started my first auto’s in small pots and stunted 2 of them. The other 3 were transplanted early enough and grew 3-4x bigger and yielded accordingly.

If you start them in those cups, remember to transfer early into final pot.

3 Likes

Thanks for the heads up. My tent is supposed to arrive in 2 more days, so I’ll just move them to the bigger pots now.

@TommyBahama

If planted in cups, you can just leave them. They’ll be fine for 10-12 days there and watering is easier. My stunted ones grew 3 weeks in small pots. The others grew 2 weeks and were fine.

Holy cow. I misted the soil in my cups this morning. 3 hours later I was walking by and just decided to take a glance. One of the White Widow plants popped right up since then. It’s sticking up 1/2 an inch out of the soil!

6 Likes

Gosh, I completely missed you were doing autos. That’s why I don’t use the cup method myself: it tends to be too stressful to transplant autos.

I use rapid rooters in a heated, domed germination tray. I would never use the cup method on autos. I would never use styrofoam, either. But, what I do doesn’t matter, b/c it is your grow. :grinning:

Remember: pot plants are not tomato plants.

A status update.
The plants have been growing for 5 days now. I have had them in my space bucket, under 2-3 (I vary the number to control the temperature) 6500K CFL bulbs running 20 hours a day. The temperature has varied between 73-78 degrees Fahrenheit during that time. I have been misting them with distilled water 3 times a day. Yesterday I removed the clear plastic humidity domes I had over them, after an article I read suggested I should only utilize those until the leaves appeared.
I think the Super Skunk looks okay, but will let the experts tell:


The White Widow on the other hand has kind of drooped over and has varying colors in the stem. Right after I took this photo, I carefully removed that seed coat. It doesn’t seem like it weighs very much, but perhaps that is contributing to the plant drooping over.

1 Like

I would put some soil around that stem to prop her up.

1 Like

Thanks. I put some soil around it and I stuck in a toothpick for it to lean against.

1 Like

Excellent, that stem will grow roots now.

2 Likes