I already posted much of this in my Grow Journal, but I thought I’d add this over here to see if I can get some more feedback and advice about this build.
My fiancee and I are just getting started with growing our own marijuana and our primary concern was concealment of our grow space. Sure we’d like high yields, however we don’t see the point if it’s going to jeopardize our jobs. So I recalled an article I’d read in High Times maybe 15 years ago or so about a grow box that was concealed inside an old refrigerator. With that in mind, we proceeded.
We started with an old GE refrigerator that we picked up off of Craigslist. A little bit of hunting and calling and we found one that was priced correctly: free. As we were going to be gutting it, we didn’t care if it worked or not so it wasn’t all that hard to find one. We pulled all the external components off and then gutted the interior of everything. I was hoping to get a fridge that had wire racks so we could repurpose them as grow shelves or light harnesses, etc. No such luck, our shelves were all glass and very dirty/scratched. Out they went. One thing to note is that there was still freon in the lines, so be careful to drain the tank before tearing everything out and make sure you’re able to ventilate your work area.
Once we had it stripped to a bare box, I used my Dremel tool with the standard cutting attachment to slice out the horizontal wall separating the lower refrigerator from the upper freezer. We had initially planned on installing lights, fans, humidifiers, etc up there and piping everything to the lower grow chamber, but I quickly decided that the bottom was way too small for our purposes. One or two cuts and I was able to pop that wall right out with no damage to any other surfaces. Then I cut off the plastic shelves that were attached to the doors. They extend 4-6" off the doors and were attached underneath the magnetic seal around the edge of the door. Rather than try to disassemble the door and risk compromising the seal, I was able to quickly cut them all off though there was a significant amount of white plastic shavings all over the garage floor. We then scrubbed the interior thoroughly to make sure we had a sterile environment before continuing.


Reading the forums here, we learned that in such a small space ventilation and heat would be our biggest challenge. We stopped by our local hydroponics supply store and picked up a 4" inline fan and a carbon filter to eventual use. We were able to expand a high hole on the back wall where water for the ice maker was pumped in. We ran a duct down the back of the fridge and down the now empty negative space where the motor and freon tank had previously been. We were able to secure the fan to the surface with the included hardware and some 90 degree brackets I had laying around. I decided not to securely mount the filter as we would obviously need to be able to clean and replace it from time to time, so I ran a couple of screws into the surface and found a way to mount the filter using picture-hanging wire and duct tape to create a good seal with the fan. I’m a bit concerned about the efficiency of this system as the ducting is long with several turns and the fan is pulling air, rather than pushing it. Additionally, I have no idea how effective the filter will be in this configuration, but the manufacturer assured us that it would do the job no matter which direction you routed the air flow. For the intake, I used a 1.5" spadebit to drill a couple of holes in the slanted wall on the floor of the fridge.


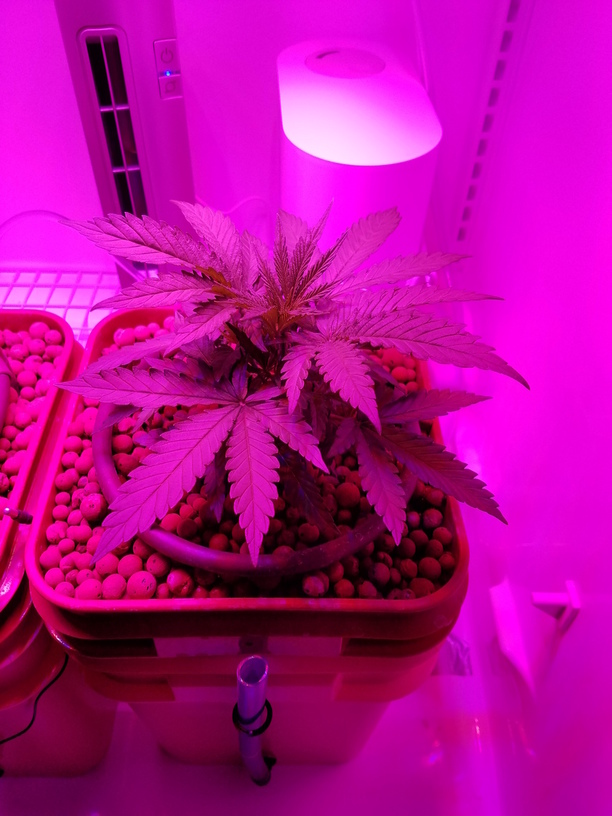
We opted for an LED bank of lights, Kind K3-L450. It was easily the most expensive part, but we wanted to reduce the amount of heat the lights added to our box and reduce future power costs. The included attachment didn’t offer any ability to raise or lower the lights, so I quickly decided I wanted to create a pulley system later on. We initially screwed some hooks into the ceiling to mount it, but the plastic shell is only a few millimeters thick and the interior insulation isn’t very dense, so we were’t satisfied that the hooks were very secure.


To mount the pulleys, I drilled some .25" holes into the ceiling and drove some eyebolts through them. A wide washer and nut were attached to secure the bolts, and then I took my Dremel metal cutting disc and lopped off the remaining bolt to keep the hardware as flush with the fridge as possible


The pulleys weren’t exactly cheap and I had to do a little bit of google-fu to figure out how to route the nylon string, but I outsmarted it and am happy with the results. I screwed a tie-down to the wall and now we can raise and lower the light with ease. It has a tendency to get lopsided, but the nylon string is limber enough that we can level the light bank very easily.

Rather than allow the sloping wall on the floor to eliminate a third of my space, I also installed a cheap wire rack I picked up at Target for a couple of bucks. It’s pretty sturdy, at least enough to hold a humidifier, air pump and clip fan…

With all that done, the last thing to worry about was snoopers. Obviously disguised as a refrigerator, no one is likely to think twice about it. But idle curiosity being what it is, we wanted to be able to keep idle hands from taking a peek. I installed some gate shackles to the door and exterior wall and now we can lock it up when there’s a chance of someone snooping.

The final product:


With the clip fan to encourage air movement and the fan running on medium, the fridge sounds pretty normal… maybe a bit loud, but nothing alarming or weird. We’ve been holding steady between 72-78F but humidity was so low it wasn’t even registering. I picked up a $10 portable humidifier from the drug store and now we’re keeping it solidly at 30-40%, not ideal but better than bone dry. Once we have larger plants and hydro tanks inside, I believe it will go up a bit more. We’ve opted for a couple of GH’s 4120 kits because they’re fairly easy.
We just germinated a couple of seeds and are getting going now. We’re planning on a ScroG grow. I’m going to install some screw hooks along the wall about a foot or so higher than the top of the hydro tanks and hang some thin 2" chicken wire. The wire should be light enough that when we need to change the water or clean the tanks, we can unhook the wire from the hooks and (hopefully) just hang it off the plants.
Anyway, that’s it. Any thoughts for improvement?